How to Build the Perfect Media Room: A Complete Guide to Creating Your Ultimate Home Theater Entertainment Space
Introduction
Building the perfect media room requires strategic planning across three core areas: space optimization, audio-visual technology, and comfort design. Whether you’re converting a basement, bonus room, or dedicated space in your own home, the decisions you make about room dimensions, equipment placement, and acoustic treatment will determine whether your movie nights feel like a cinema experience or a frustrating compromise.
This guide covers room planning, equipment selection, acoustic treatments, seating arrangements, and lighting design for homeowners ready to create a dedicated home theater room. We’ll focus on practical DIY approaches alongside professional options, with budgets ranging from $5,000 to $50,000. Advanced home automation systems and commercial theater installations fall outside this scope.
The perfect media room combines proper room dimensions (minimum 12x18 feet recommended), dark paint colors, comfortable tiered seating, quality surround sound, and acoustic treatments to create an immersive viewing experience that transforms how your whole family enjoys entertainment.
By following this guide, you’ll gain:
-
Optimal room layout strategies for any square footage
-
Equipment specifications for projectors, large screens, and sound systems
-
Acoustic solutions that eliminate echo and improve sound transmission
-
Lighting control techniques for a true cinema-like experience
-
Budget allocation strategies that maximize impact per dollar spent
Understanding Media Room Fundamentals
A “perfect” media room balances three elements: technical performance that delivers crisp visuals and enveloping sound, physical comfort that supports movie marathons without fatigue, and design cohesion that reflects your personal style. Unlike a family room with a TV, a dedicated media room prioritizes the viewing experience as its primary function.
Modern families increasingly seek spaces where everyone can gather for entertainment—whether watching movies, playing video games, or streaming sports events. A well-designed theatre room serves as both an escape and a gathering place, making all the difference in how your household spends quality time together.
Room Types and Configurations
A dedicated media room serves exclusively for entertainment, allowing complete control over lighting, acoustics, and design. Multipurpose spaces—where the room doubles as a game room, guest bedroom, or storage room—require compromises but remain viable with careful planning.
Basement media rooms offer natural light control and sound isolation from the rest of the house, making them ideal candidates. However, moisture control and low ceiling heights present challenges. Bonus rooms above garages provide separation from living areas but may have vaulted ceiling configurations that complicate speaker placement. Converted bedrooms typically offer the easiest electrical access but smallest square footage.
Your room type directly affects design decisions and budget. A basement with concrete walls needs different acoustic treatment than a bonus room with drywall and a vaulted ceiling, and these differences cascade through equipment choices, seating capacity, and installation complexity.
Essential Design Principles
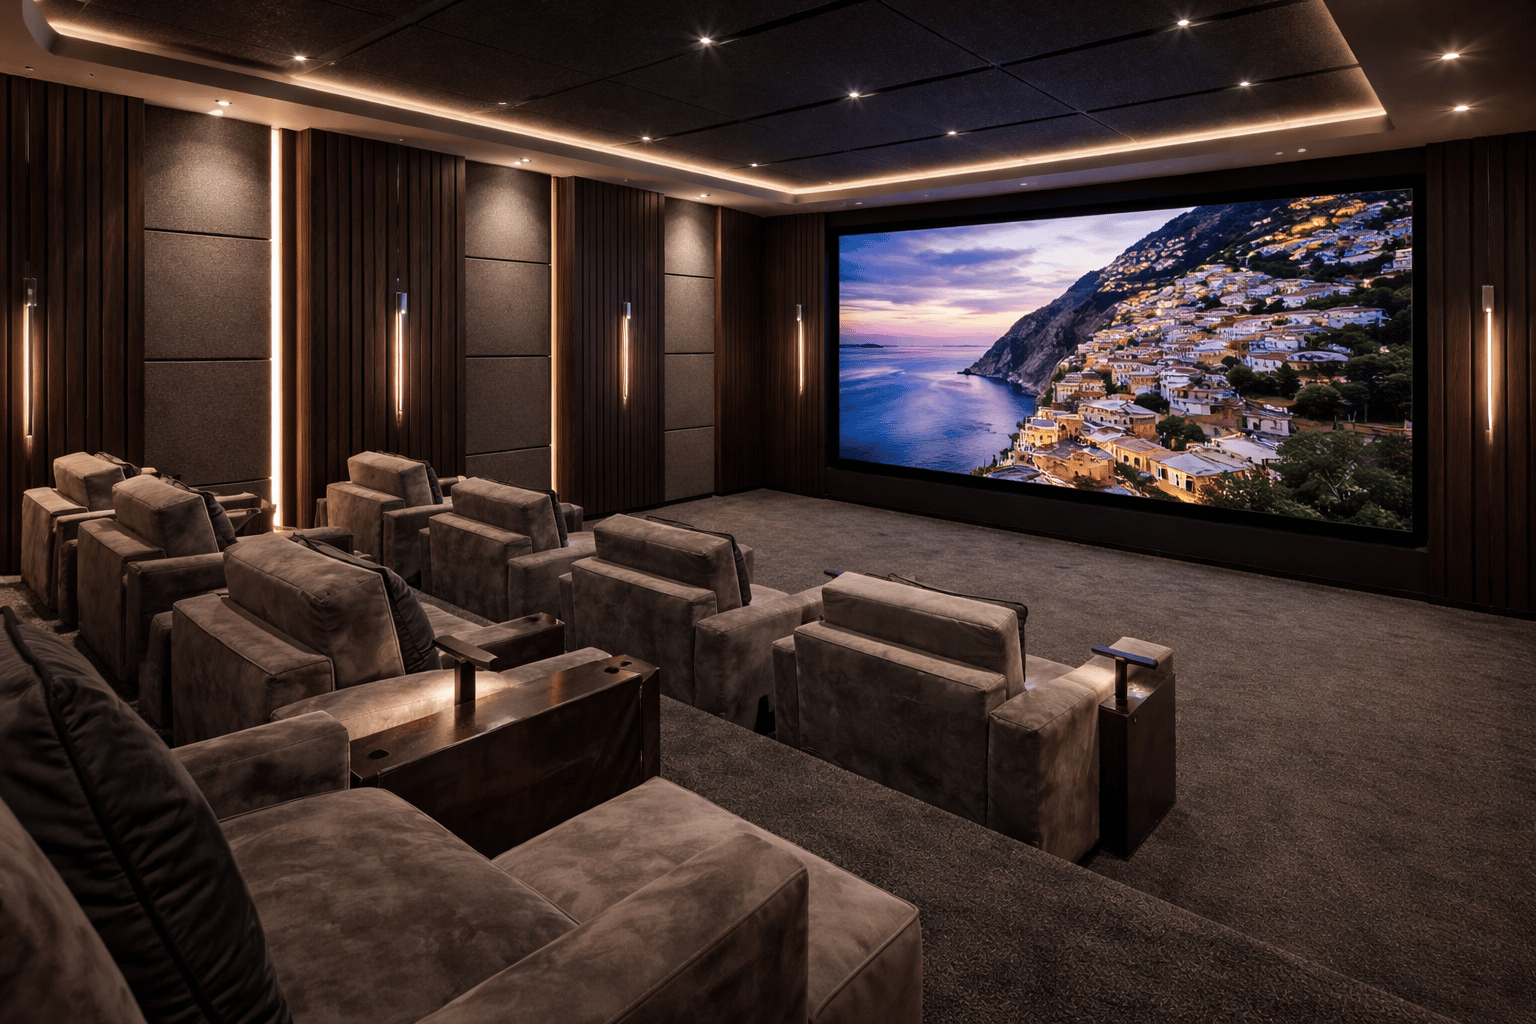
Theater-style design centers on creating a dark room that eliminates visual distractions and maximizes screen contrast. Dark paint colors—deep charcoals, navy blues, or black—absorb stray light rather than reflecting it onto your projector screen or big screen TV. Controlled lighting means eliminating windows or installing blackout treatments, then adding dimmable fixtures for ambiance.
Comfort-focused design prioritizes the whole family’s needs. This includes accessible seating arrangements, adequate space between rows for movement, and built-ins or storage solutions for remotes, blankets, and concessions. The cozy atmosphere that makes people want to linger matters as much as technical specifications.
These principles directly inform the spatial requirements we’ll examine next, where room dimensions determine what’s achievable within your space.
Planning Your Media Room Space
With design principles established, we move to the practical measurements and infrastructure that transform a room into a functional media space.
Room Dimensions and Layout
For a proper home theater experience, aim for minimum dimensions of 12 feet wide by 18 feet deep. This provides adequate viewing distance for screens up to 120 inches and allows for two seating rows. Rooms smaller than this can still work but limit screen size and seating capacity.
Ceiling height matters more than many realize. An 8-foot ceiling is workable but restricts tiered seating options. A 10-foot ceiling allows for proper risers and in-ceiling speakers for Atmos configurations. If you’re fortunate enough to have a vaulted ceiling, plan speaker placement carefully—asymmetrical heights create acoustic challenges.
Consider door placement and traffic flow. Ideally, the door sits at the back wall or side walls rather than the front of the room, preventing light intrusion and movement distraction during viewing. The screen wall should occupy the short wall of a rectangular room, with the primary seating position centered.
Viewing Distance and Screen Sizing
Calculate your ideal screen size using viewing distance. For 4K content, optimal viewing falls between 1 to 1.5 times the screen’s diagonal measurement. For 1080p, extend this to 1.5 to 2.5 times. In a room with 15 feet of usable viewing depth, a 100-120 inch projector screen hits the sweet spot for 4K.
Projectors excel in dedicated spaces where light control is absolute, offering the large screen cinema experience at lower cost-per-inch than massive TVs. However, smart TVs and large-format displays (85-110 inches) suit multipurpose spaces better, delivering superior brightness and contrast without requiring a dark room.
For multiple seating rows, the back row should remain within the maximum recommended viewing distance while still providing adequate immersion. Test viewing angles before finalizing—seats beyond 30 degrees off-center experience noticeable image degradation on most displays.
Infrastructure Requirements
Electrical work makes or breaks your project. Plan for:
-
Dedicated 20-amp circuits for projectors, receivers, and powered subwoofers
-
Outlet placement behind the screen wall for all the equipment, plus floor outlets for powered seating
-
Dimmer-controlled lighting circuits separate from equipment power
HVAC considerations often get overlooked. AV equipment generates significant heat, especially projectors running 200+ watts. Ensure adequate supply and return air in equipment closets, and consider room-wide capacity—a space filled with people and electronics needs more cooling than the same empty room.
Pre-wiring during construction or renovation saves enormous expense later. Run speaker wire to all wall speakers and ceiling speaker locations, HDMI and control cables to equipment positions, and network drops for streaming devices. A false wall at the front of the room can house speakers, subwoofers, and wiring while creating a clean screen wall appearance.
Key planning phase takeaways: Measure twice, wire generously, and plan for future expansion. The infrastructure you install now determines what’s possible later.
With planning complete, we move to equipment selection and installation procedures.
Essential Media Room Components and Installation
Building on your planned infrastructure, this phase covers the actual construction and equipment selection that brings your media room ideas to life.
Audio-Visual Equipment Setup
Your display choice—projector or television—anchors all other decisions. Use this process for a coordinated installation:
-
Select and mount your display device. For projectors, install a ceiling mount at the calculated throw distance and a fixed-frame or tensioned projector screen on your screen wall. For TVs, use a low-profile mount rated for the display weight, positioning so the screen center sits at seated eye level (typically 40-48 inches from floor).
-
Install your surround sound system. A 5.1 configuration provides front left, center, front right, two surrounds, and a subwoofer—sufficient for most rooms under 300 square feet. Larger spaces benefit from 7.1 (adding rear surrounds) or Atmos configurations with height channels. Position front speakers at ear height, surrounds at 110-120 degrees from center, and subwoofers in corners or along the front wall for optimal bass response.
-
Set up media sources. Centralize streaming devices, game consoles for those who play video games, and cable boxes in an equipment rack with adequate ventilation. Run all sources through an AV receiver for unified switching and audio processing.
-
Configure your control system. Universal remotes or tablet-based systems like Logitech Harmony or Control4 eliminate the frustration of managing multiple devices. Program common activities—“Watch Movie,” “Game Night”—for one-touch operation the whole room can use.
Room Treatment Comparison
Acoustic and visual treatments dramatically impact your results. Choose based on budget, skill level, and permanence desired:
|
Treatment Type |
DIY Option |
Professional Option |
|---|---|---|
|
Paint Colors |
Sherwin Williams Iron Ore, Benjamin Moore Hale Navy, or Tricorn Black applied in the same color throughout |
Custom color matching with acoustic-dampening additives |
|
Acoustic Panels |
2-inch fiberglass insulation wrapped in breathable fabric, mounted at reflection points |
Professional panels with NRC ratings of 0.85+ and custom bass traps |
|
Flooring |
Plush carpet or layered area rugs over hard surfaces |
Raised flooring with integrated cable management and acoustic underlayment |
|
Wall Treatment |
Heavy curtains on side walls, fabric-wrapped panels |
Full fabric wall systems with hidden acoustic treatment |
DIY approaches save 40-60% but require careful execution. Professional installations guarantee results and typically include calibration, but double or triple material costs. For most homeowners, a hybrid approach—DIY acoustic panels with professional AV calibration—balances value and performance.
Seating and Lighting Installation
Tiered seating transforms the viewing experience by ensuring the back row sees over heads in front. Construct risers 8-12 inches high using 2x8 or 2x10 lumber framing with ¾-inch plywood decking, ensuring at least 6.5 feet depth per tier for recliners with extended footrests.
Lighting installation requires multiple zones. Recessed ceiling fixtures on dimmers provide pre-show illumination. LED strip lighting behind the screen (bias lighting) reduces eye strain during viewing. Step lighting along risers ensures safe movement in the dark room. All lighting should reach zero output—not just dim—when movies play.
Install built-ins or media credenzas for component storage, game controllers, and the inevitable accumulation of remotes and accessories. Furniture placement should maintain clear sightlines while creating the cozy atmosphere that encourages friends and family to stay for just one more episode.
Common Challenges and Solutions
Even well-planned media rooms encounter problems. These solutions address the issues most frequently reported during construction and first use.
Poor Sound Quality and Echo Issues
Untreated rooms produce harsh echoes and muddy bass that ruins dialogue clarity. Install acoustic panels at first reflection points—the spots on side walls and the ceiling where sound bounces from speakers to seating position. Use 2-inch thick fiberglass or mineral wool wrapped in acoustically transparent fabric.
Supplement panels with soft furnishings: heavy curtains, plush carpeting, and upholstered seating all absorb reflections. Bass traps in corners control low-frequency buildup that causes boomy, undefined bass. Test with calibration microphones (most modern receivers include them) and adjust panel placement based on measured results.
Inadequate Equipment Ventilation and Heat Management
Enclosed cabinets and cramped equipment racks cause overheating, leading to shutdowns and reduced component lifespan. Create a dedicated equipment closet or cabinet with active cooling: install an exhaust fan near the top of the space and intake vents near the bottom, ensuring positive airflow across all components.
Use open-frame equipment racks rather than enclosed furniture, maintaining 6 inches clearance around high-heat components like projectors and receivers. For putting equipment in closets, thermostat-controlled fans activate when temperatures exceed safe levels.
Uncomfortable Seating Distance and Viewing Angles
Seating too close causes eye strain and visible pixels; too far diminishes immersion. Apply the 1.5-2.5 times screen width guideline and test extensively before permanent installation. Sit at your planned positions and watch varied content—dialogue-heavy films, action sequences, sports—to verify comfort across use cases.
For smaller rooms where ideal distance isn’t achievable, swivel chairs or adjustable seating allow viewers to optimize their position. In rooms with wide seating arrangements, ensure no seat exceeds 35 degrees off-center from the screen, or consider a curved projector screen to equalize viewing angles.
Testing before finalizing any installation prevents costly corrections later.
Conclusion and Next Steps
The perfect media room emerges from deliberate choices in space planning, equipment selection, acoustic treatment, and comfort design. Technical performance matters—proper speaker placement and room treatment create the high-end sound that defines a true theater room—but so does the cozy atmosphere that makes your new space the perfect spot for the whole family.
Your immediate next steps:
-
Measure your space precisely, noting ceiling height, door placement, and any architectural obstacles
-
Establish budget priorities—allocate roughly 40% to audio-visual equipment, 25% to seating, 20% to acoustic and lighting treatment, and 15% to construction and finishing
-
Plan electrical requirements and schedule any necessary pre-wiring before wall finishes
-
Test equipment placement and seating positions before permanent installation
As your media room makeover matures, explore advanced topics like smart home automation integration (finally linking lighting, climate, and AV control), custom cabinetry for a luxurious feel, and media room inspiration from professional installations that can inform future upgrades.
Additional Resources
Recommended Materials:
-
Paint: Sherwin Williams Tricorn Black, Iron Ore, or Benjamin Moore Hale Navy for walls; warm tones optional for accent lighting
-
Acoustic panels: Owens Corning 703 or Rockwool Safe’n’Sound, minimum 2-inch thickness
-
Measurement tools: Laser distance measurer, SPL meter or calibration microphone, viewing angle protractor
Professional Services: Consider professional consultation for electrical work requiring permits, structural modifications for tiered seating, and final audio calibration.
Equipment Sizing Guidelines:
-
Under 150 sq ft: 65-85 inch TV, 5.1 sound system
-
150-300 sq ft: 85-110 inch TV or 100-120 inch projector screen, 5.1 or 7.1 sound system
-
300+ sq ft: 120-150 inch projector screen, 7.1 or Atmos sound system, multiple subwoofers
Your basement, bonus room, or dedicated space holds the potential for a truly immersive media room that brings all the rage of theater viewing into your own home—where movie nights finally match the experience you’ve imagined.
If you are looking for a professional company with vast experience in dedicated theater room design and execution, contact Get Wired Tec to schedule a complimentary consultation.